23 December 2012

Ghias sweater - Done

Knitter happy dance ... after basically rewriting the pattern, its finally done .. next on my list is a little black dress for Ghia .. pictures of her wearing her hoodie coming soon

14 December 2012

**censored remarks** dammitall

Ah bloody hell!!! took me long enough to figure out what end was up with this pattern. .. Thanx to Gina i did and i rather think i outsmarted myself. . Bloody thing is 24 1/2” around. . (censored remarks) time to rip it apart AGAIN. .. And go back to my origiinal plan of Large sze (16”) on US10 needles. ..

Take 2 1/2 .. //grumbles

12 December 2012

Ghia sweater ... take 2

Frogged the sweater i started for a friends dog 2 years ago lol .. found another that's not all ribbing .. hope to start today .. gotta do some math cuz her dog is 20 inches round the chest and most patterns are 16-24 .. ugh .. so larger needles than pattern calls for should do the trick .. i hope .. you know I lost the end and had to hunt it down lol

10 December 2012

All done!

Didn't take all that long to do .. very pleased with the results.  I'll do this one again .. definitely a favorite!

09 December 2012

Ahh that's better

I'm way happier with his now .. doesn't look like such a beanie now .. just added one more repeat than the pattern called for .. now will follow the rest of the pattern .. maybe it'll be done today :D

05 December 2012

I *DO* like this!

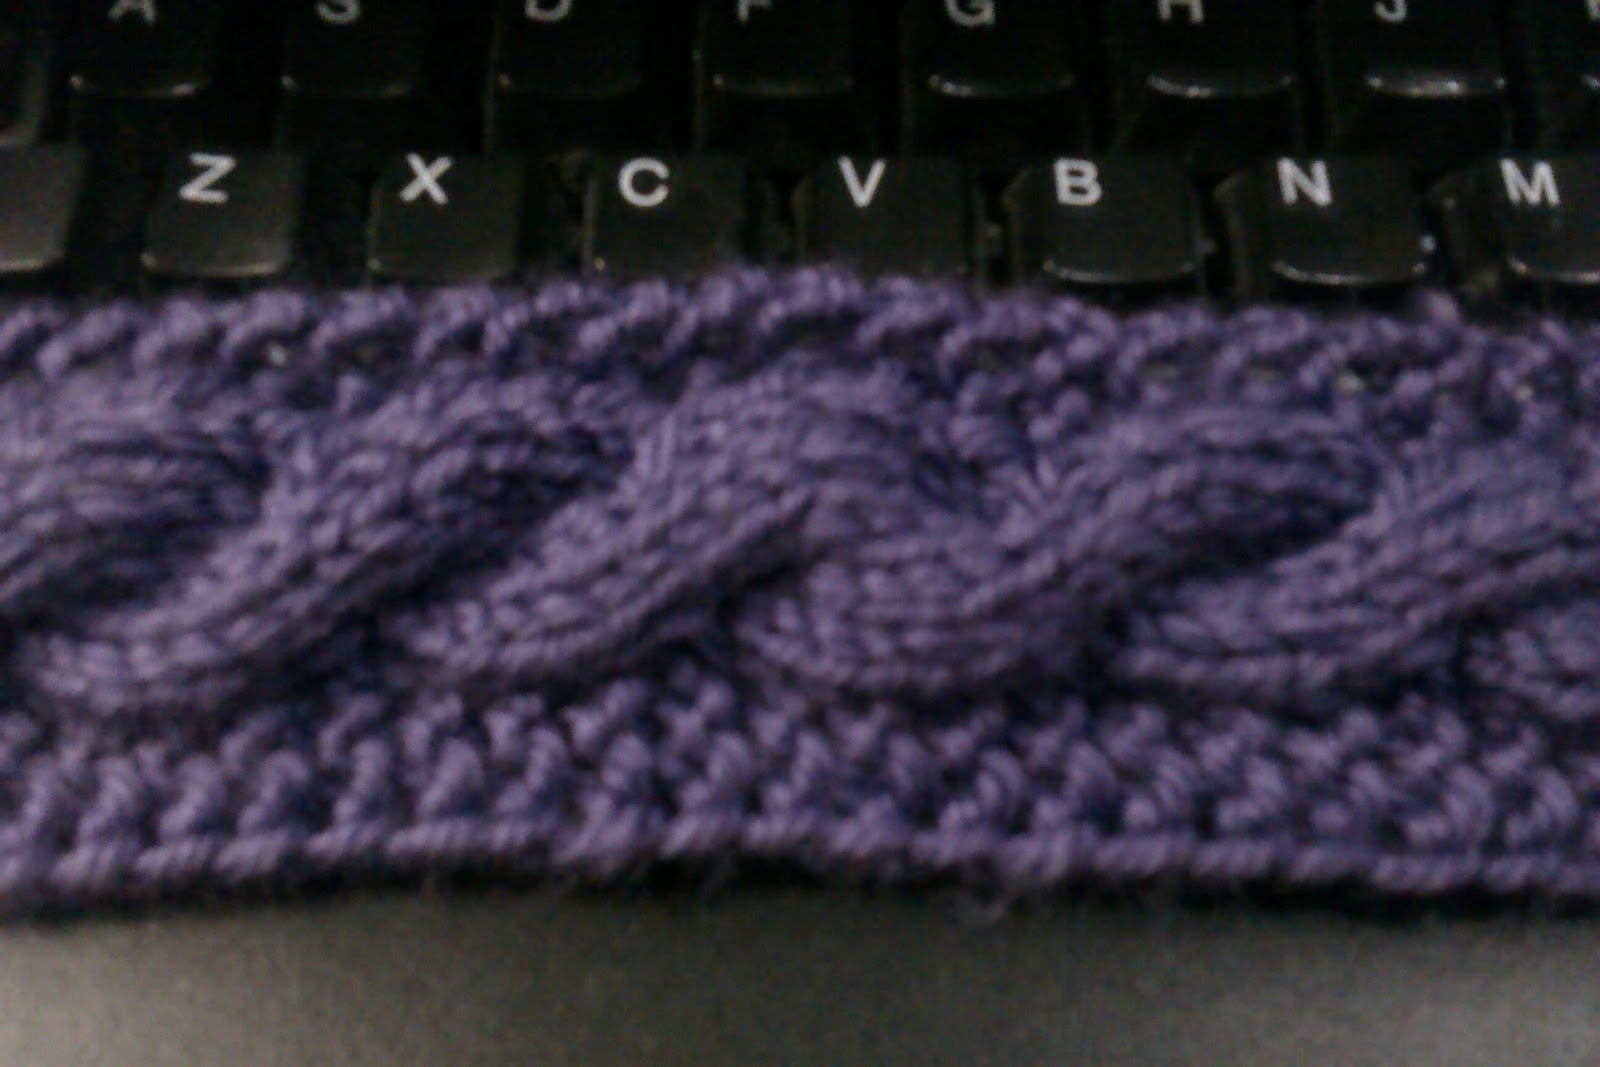
I must say I'm quite pleased with the way this is shaping up .. granted I'm taking some liberties with the pattern .. should be no shock there .. the cable band and the pattern stitch are well suited for each other .. not so sure at the length so I'm at the point where I should be decreasing, but will add another pattern set or two

23 November 2012

Cable Band ..

Love the way this is working up .. hoping this looks as awesome in reality when done as its looking in my mind :). Needles crossed lol .. and of course the colour doesn't look right in the picture :(

22 November 2012

Bread and cheese with mushrooms

I tripped over this as an image on facebook, and its in bulgarian LOL .. so gotta love google translator :)  Some of the wording is a bit awkward, but no worse than listening to my grandmother speak her English when i was growing up ... Never thought of it, but I guess us children and grandchildren of immigrants could prolly consider our elders language skills as a second language.. no this isn't a slam, more a fond memory of of have my grandmother switch from English to Ukranian in mid-sentence LOL .. and it only got worse as she got older. Brings up some awesome memories :)
Original post can be found at Bread With Cheese & Mushrooms


Bread and cheese with mushrooms

Source: Transmission "Bon Appetit" by Laura and Stoyan, 10/27/2012
40 minutes
for 4-6 servings
    
Ingredients:
1 round loaf
400 g mushrooms
100 g butter
280 g processed cheese
3-4 green onions
2 tsp poppy seeds
3-4 sprigs thyme
1 tbsp butter for mushrooms
Method of preparation:

1. Mushrooms Peel and thinly slice.
2. In a pan heat 1 tbsp oil in it twice fry mushrooms. Add the thyme leaves and then the court is pulled from the heat.
3. The bread is cut into squares without touching the bottom crust. Should remain intact.

4. Butter is melted and mixed with small pieces chopped onion and poppy seed.
5. Bread is placed on a sheet of aluminium foil and fill with slices diced cream cheese and fried mushrooms and pressed into the holes nice. Spread with butter mixture and wrap in foil. 
6. Bake in preheated 180 degree oven with a fan for 15 minutes. Then remove the foil and bake another 10 minutes.

18 November 2012

Brioche .. Bagged

Finally, I got back to my scarf ... took the threat of snow to get me moving tho .. but its finally done .. This was such an easy pattern to do, least it was once I found a pattern that make sense to me! I shared my 'adventures' with you in this blog post

Now I'm digging round for a slouchy beret pattern  that uses a cable like this .. Think I need to do a combination of two patterns that I found on Ravelry ..the band from this pattern ... (I can do the brioche stitch for it if I want)  Having an issue deciding between Star Crossed Slouchy Berry or Spring Beret. I'm leaning towards the Star Crossed one as its a more slouchy version and I dont have to fuss with the pattern

06 April 2012

Sweet and Spicy Shrimp


This recipe is from food.com submitted by kim petro

Read more: http://www.food.com/recipe/sweet-and-spicy-shrimp-236548


Ingredients:

Servings: 4
Units: US 

Directions:

  1. 1
    Place the shrimp in a bowl. Drizzle with oil, season with salt and pepper --
  2. 2
    Coat large nonstick skillet with cooking spray and place over medium high heat for 1 minute -- Add the shallots and ginger, cook for 3 minutes -- Add the garlic; cook for 1 minute -- Stir in the tomatoes and cook for 3 minutes or until softended --
  3. 3
    In a cup mix the water and mustard, (if you use a milder mustard skip the water). Add to skillet. Stir in the vinegar and honey. Cook for 2 minutes, or until the sauce is reduced and thickened.
  4. 4
    Add the shrimp. Cook for 3 minutes or until shrimp are opaque.


Read more: http://www.food.com/recipe/sweet-and-spicy-shrimp-236548#ixzz1rJsuuyct

28 March 2012

Domino Square Potholder Pattern

Here's another great article from interweave ... full article [read more]

Imagine all the great things you can make using this technique .. towels, throws, rugs, maybe even a shawl if you're able to create a pattern on your own :)

Domino Square Potholder 

Measurements: 
7.5" x 7.5" (19 x 19 cm) without border, 8" x 8" (20 x 20 cm) with border
Yarn:
 DK weight cotton yarn
Colors: 
Purple, fuchsia, and violet
Needles:
 Dn 4 (3.5 mm). Circular needle 4 (3.5 mm) for the border.

Abbreviations 

K-CO: knitted cast-on
dn: domino needle (see info below)

Spacer 10x10 pixels
K-CO 75 stitch on dn and knit a square (see instructions below) with 9 purple ridges, 1 fuchsia, 1 purple, 10 fuchsia, 1 violet, 1 fuchsia, ridge and the rest with violet. When 3 stitches remain, knit a 2¾" (7 cm) long strip for the loop. Turn the loop to the wrong side and sew it down neatly.


How to Knit a Basic Domino Square

Using the knitted cast-on, CO 25 stitches.
Row 1 (WS): Knit to the last st, p1. Mark the center three stitches.
Row 2 (RS): (Note: The yarn tail hangs at the right side.) Sl 1 kwise, knit to marker before center 3 sts (=k10), sl 1 kwise, k2tog, psso, knit to the last st (= 10sts), p1 (= 23 sts).
Row 3 and all WS rows: Sl 1 kwise, knit to last st, end p1.
Row 4: Sl 1 kwise, knit to marker before center 3 sts (= k9), sl 1, k2tog, psso, knit to last st (= k9), end p1 (= 21 sts).
Row 6: Sl 1 kwise, knit to marker before center 3 sts (= k89), sl 1, k2tog, psso, knit to last st (= k8), end p1 (= 19 sts).
Row 8: Sl 1 kwise, knit to marker before center 3 sts (= k7), sl 1, k2tog, psso, knit to last st (= k7), end p1 (= 17 sts).

Continue in this manner until 3 sts remain.

Next row (WS): Sl 1 kwise, k1, p1.
Next row: Sl 1, k2tog, psso (= 1st) This is a live stitch that you will use when you knit the next square. 

Knitted "Mouse Teeth" Picot

With circular needle, purple yarn, and right side facing, pick up and knit 75-76 stitches in the stitches of the CO row. Knit 1 row. 
New row: *Using the first stitch on the needle as the beginning stitch, K-CO 2 new stitches, BO 4 stitches, move the stitches on the right needle to the left needle*; repeat *-*. Cut yarn and pull tail through last stitch.

Domino Needles (Dn)
 
According to Vivian Høxbro, "A pair of domino needles is absolutely indispensable. The needles are only about 8" (20 cm) long, with a knob on one end so that the needle ends won't get stuck in your clothes or your knitting."

I agree, knitting small pieces is easier if you use short needles. You can buy short needles if you want to or simply place point protectors on a pair of double-pointed needles and use those. Double-pointed, double-duty! When you need to return the needles to their set, just take off the point protectors and you're good to go. I use DPNs all the time when I'm knitting scarves or baby clothes.

You could also use circular needles; I'd recommend 24-inch needles because 16-inch circulars are too short to comfortably work with, and a cable longer than 24 inches can be awkward when you're turning your work all the time.

Another reason that short needles are great in this type of knitting is because you use less movement when you're turning the work, which is a good thing and helps avoid repetitive-motion injuries.

19 March 2012

joining yarns

Found a nice tidbit on joining yarns, i admit i've gotten lazy and just knot the pieces and it gets buried in the stitch or to the back .. ive been lucky so far ;)  but here is another method i've used along with using 2 threads from each piece.  This is just the how-to that Kathleen has posted in her Knitting Daily article, to see the full article [read more...]


Overlapping Old and New Yarn

Use this joining method in an inconspicuous place, such as 1-2 inches from the side edge or in a textured area. This method is well suited for wools, synthetics, blends of any kind, and novelty yarns that are worsted-weight or finer. When worked with nonelastic yarns such as cotton and ribbon yarn, this join may be visible from the right side.

Step 1. Overlap the end of the old ball and the beginning of the new ball for about 6 inches.
Step 2. Work two stitches with the two strands held together as if there were a single strand.
Step 3. Drop the strand from the old ball and continue working with the new.
Step 4. On the next row, work the double-stranded stitches as if they were single-strand stitches. During finishing, secure the two loose ends by weaving them diagonally into the wrong side of the knitted fabric (weaving them horizontally or vertically may create a visible ridge on the right side).

—From The Knitter's Companion by Vicki Square

Now the trick here is how you position the new yarn with the old yarn. Take a look at the Step 1 illustration above. See how the tail of the new yarn (shown in blue) points to the right and the end of the old yarn points to the left? That's the key. I was holding the tail and end of the old and new yarn together and not overlapping them correctly, creating a twisted stitch with the new yarn.

No more bummer!!

16 March 2012

Honeycomb Stitch

From the interweave Knitting Daily - for full article [read more]

Honeycomb, from Pop Knitting
Stitch count: multiple of 22.
Two colors.


Rows 1-15: With color 1, work in stockinette, beginning on WS with a purl row.
Row 16 (RS): 
With color 2, *(pick up 1 st 7 rows below and place it on left needle. Purl that stitch together with next st) 3 times, p16, (pick up 1 st 7 rows below and place it on left needle. Purl that stitch together with next st) 3 times; rep from *.
Row 17 (WS):
 With color 2, knit.
Row 18 (RS): 
With color 1, purl.
Row 19-25: 
With color 1, work in stockinette, beginning on WS with a purl row.
Row 26 (RS): 
With color 1, *k8, (pick up 1 st 7 rows down and place it on left needle. Knit it together with next st) 6 times, k8; rep from *.
Rows 27-32: 
With color 1, work in stockinette, beginning on WS with a purl row.
Repeat Rows 1-32.

09 March 2012

Half way there

Am on a quiet time wanna watch movie phase so taking advantage and knitting .. those pot scrubbies I did last night gave me a good motivational kick in the pants to get knitting again ..

08 March 2012

Spicy Beef Stew

I posted the pic of this stew for supper and had a few requests for the recipe :D Its a family favourite, no left overs and you might want to increase the beef and tomatoes for how many servings you want ..

Spicy Beef Stew
Serves 4
Prep - 20 mins
Cook - 2 hrs


1 tbsp oil
1 ½ lbs stewing beef, cut into 1" chunks
1 med onion, coarsely choppped
1 large clove of garlic, minced
1 ½ teaspoon dried oregano leaves, crushed
1 tsp cumin
½ tsp each, red pepper flakes and salt
4 medium tomatoes, divided (roughly 4 cups)
½ - 1 cup water - you might want to add more towards the end ... it will thicken with the cornstarch mixture
1 can (4 oz) green chilies (I have a heck of time finding these so i use jalepenos)
1 tbsp cornstarch
½ cup green onion tops, sliced
  1. Heat oil in Dutch Oven over med-high heat. Add beef pieces, onino and garlic; cook and stir until beef is browned
  2. mix oregano, cumin, red pepper flakes and salt; sprinkle over meat, stir in
  3. add 3 cups of tomatoes and water, stir.  reduce heat to low and cover; cook for 1 hr 55 mins or beef is tender
  4. drain green chilies, reserve liquid; slice chilies into 1/2" pieces; add to pot
  5. mix cornstarch with chili liquid, add to stew; cook until comes to boil and thickens
  6. add remaining tomatoes, stir and heat through
  7. serve and garnish with green onion tops

Free Lush Lacy Mitts Pattern

I just love this pattern from Sweaterbabe.  Matter of fact i love most of her work .. absolutely amazing stuff and shes on ravelry too!  I found her a few years ago while hunting for a unique sweater pattern - and all her stuff is unique!  She works with a lot of texture and cables - which ya'll know i LOVE!  I'm on her mailing list and just wanted to share these mitts with you.  these are going into my queue on ravery :)

At any rate, here's the requirements for this pattern - please visit her site to download the pattern :)

Lush Lacy Mitts PDF Knitting Pattern
My Lovely Lace Fingerless Gloves were inspired by my love of vintage lace and desire to have a quick knit gift project!

I’ve always loved the elegance of fancy evening gloves that feature many pearl buttons running down the wrist and forearm. So chic and ladylike, but not wearable for every day.

I designed these with an opening at the back, so it could then be adorned with fancy beads or pretty buttons for the faux button closure. The bonus was that the first half of this project could be worked quickly and easily on straight needles before needing to switch to DPNs (which I tolerate, but aren’t my favorite, ha ha).

The lace pattern is a lovely double leaf lace that was the perfect number of stitches to achieve the all-over lace design. Limiting myself to one ball was also a fun challenge and a great way to attack my stash and make room for new yarns..

See the Web-Letter from Classic Elite yarns about this free pattern.

These photos taken by Meg Myers of Classic Elite yarns.

Finished Size(s): 
Adult M: approx 7" circumference unstretched, and 8" long.

Skill Level: 
intermediate knitting project 


Yarn Used:
 Classic Elite Lush (50% Angora/50% Wool); 
1.75 oz/50g (123 yd/112m) per hank: 1 hank in color #4407 Thistle

Gauge(s): 
Pattern Gauge: 
13 stitches = approx 3 1/2" [9 cm] in Lace Stitch patt on Size 9 [5.5mm] needles.
Yarn Label Gauge and Information:
 A medium, worsted weight yarn in a soft angora/wool blend with a gauge of 4 sts = 1" on size 8-9 needles.

Total Yardage Required:
 
123 yds [112 m].

Some suggested yarn substitutes to try:

If you have a yarn substitute to suggest for this project, email us!

Knitting Needles Used: Knitting needles and dpn in size US 9
(5.5 mm) or size to obtain gauge.

* * *
Please note: SweaterBabe.com patterns are authorized for home use only and are not to be knit/crocheted for resale. All pattern sales are final. 

Chasing My Tail

I needed a break from my scarf, I wasn’t moving along with it as I’ve hoped for a variety of reasons. It is coming along, it IS easy peasy and mindless. Same stitches over and over again .. I don’t even really have to look at the pattern anymore. But, you always need a little project thats super quick to keep you motivated and to keep things moving along.


So an easy, quick break project. I was talking to one of my best friends, and she mentioned (Now i have NO idea how we got on the subject, be that’s how we roll ;)), that you can use mesh bags to make scrubbies for pots. I had just pitched a mesh bag from onions and the idea perked in the back of my brain to do scrubbies with mesh ..

Tonite, I finally emptied another bag, so I took it apart and did some research. All the sites I found said to use 1½ - 2" wide strips (of course they were talking about tulle - pfft) ... well with mesh bags that is just way to thick and the whole bit was scrapped as i had already knotted the strips together, I’ll try the mesh bag again with narrower strips.

I did some hunting and finally found the spiral scrubbie pattern I wanted to make. I made it up really quick and found it was to small, but did realize that the number of stitches used is totally arbitrary. You can use any number of stitches you want as long as you decrease / increase at each end. With using this pattern, my scrubbie ended up being 2½" across, which i think is just a wee bit to small. I remembered that I have some tulle squirrelled away so I dig up a spot on my cutting table and cut strips for the tulle. I ended up using 7 - 8 strips for this pattern with the 18 CO stitches and this scrubby is 3½" - a much better size :)

Circular Scrubby CO 18 sts. (remember you can use whatever number of stitches you want to!!)
Prep Row: Knit
Row 1: Slip 1, K2tog, K13, K1 into the front and K1 into the back of the same stitch (inc), K1
Row 2: Slip 1, K1 into the front and K1 into the back of the same stitch (inc), K13, K2tog, K1
Repeat rows 1 & 2 a total of 10 times. (20 rows). BO all sts.
Seam together CO and BO edges. Draw a string through the slipped sts of one edge, pull tightly and secure. Repeat for the other slip stitch edge.


01 February 2012

Knit Slipping Along ...

Just a few pics of my progress ... i've not progressed as far as i would like to, but i AM working on .. // sigh .. it'll be spring before its done at this rate LOL .. Im pretty please with it, and this does knit up super fast! When i can get a chance to put my needles in my hand that is :s

13 January 2012

Brioche Begins

I finallly got my head wrapped around the brioche stitch, or got my head unstuffed enough to just TRY it!  The attempt was ... interesting ... to say the least, but i frogged it and tried again.  I also did a wee bit more clicking and research and found another pattern that made more sense to me.  Don't get me wrong, the orginal pattern i had found was decent enough, but I think she went to far to explain things - and made it harder than it needed to be.  This other pattern I found at Fireflower Knits made way more sense to me for some reason. Maybe because she laid out it with simple knit directions without the explanation.  It was nice to be able to start the pattern without having to read a full page of explanations that came before they needed to.  (Hmmm - maybe that's why i had such an issue with my Seafoam Flower sweater - it was over explained, and didn't have instructions where they needed to be ...food for thought there).  This specific line was my personal lifesaver "Edited to add: Slip all stitches purlwise with yarn held in front throughout."

The stitch itself is pretty mindless and creates its own rhythym once you get going - granted i needed to keep my eyes on what i was doing because of the yarn overs.   The brioche stitch itself is 3 stitches (sl 1, YO, K2TOG), and each row starts and ends with a K stitch.  Easy Peasy! 

As you can see in my pic (go ahead and click, it'll open in a new window), I got the first cable started - and also shifted my stitches over by one :( ... not even gonna try and tink (reverse knit) this, and i'll just frog it and start it again - this bit here took me less than an hour to do, so I'm thinking it's going to knit up pretty fast.  Back to the cable part - she has you slip the stitches to your cable needle, then slip them back - not to sure WHY this needs to be done .. im thinking that's where i shifted my stitches over is doing that .. ah well .. I'm excited and pretty pleased so far, even though Im gonna have to frog it and start again ..

Im doing this with Red Heart Super Soft in Royal Purple with US 10s

09 January 2012

Phase II

The first attempt went well with using the medium sized shallow bowl, but it still wasn't quite big enough, so the next step was a dinner plate.  Had to really sweet talk it to get it over the plate and the whole while i was saying, "Thank God I didn't drop any stitches' LOL ... if i had, I would've seen them then LOL ...
I put this on the dinner plate last nite, re-sprayed it with my spray bottle - this am it was damp on the underside that was resting on the towel, so its been flipped and just waiting for it to dry out totally before i try it again :)  I think its gonna be okay :D  woot woot woot .. now to decide on the scarf .. course you know i've changed my mind on it LOL

08 January 2012

Blocked Salvage Attempt

I've decided to try n salvage my poor beanie beret ... blocking should hopefully fix this.  Granted it IS acrylic yarn, but should be able to be shaped regardless.   I used a shallow bowl that we use for pasta or chicken caesar salads, force-fed it onto the bowl and wet the edges, and dampened the rest.  I know i should prolly apply heat, but will battle that later.  Let's see if this happens to work at all this way.  Keep ur fingers crossed for me please <3

umm .. blech n yuck :(

Nope, do NOT like how this turned out at all!  Doesn't look like the pattern pic at all ... and of course i think to look at the project pictures that other members posted AFTER i finished. Seems that im not the only one that ended up with this funky shape :S   This isn't a pattern that naturally shapes into a beret like the one i wrote does, but has to be blocked over a plate .. if this was done in a wool blend, then that would be an awesome idea .. but its 100% pure acrylic ..
So off to ravelry i go again to find an actual beret, i've enough of this yarn kicking round that i should be able to make up another one as this one used maybe ½ the skein. And worse comes to worse, i can ditch one of the scarf patterns i had picked. Maybe I won't need to do two scarves, if i manage to find another beret pattern i like that uses worsted / aran weight yarn.
im just so disappointed that this turned out this way.  I know i followed the pattern exactly and i knit to gauge, so not an issue at my end .. // kicks desk and sulks a bit :'(

I'm going to block this and see how it turns out .. can't be any worse than it is now, right??  Off to find a bowl / plate i can use for this .. ahhh i know ...the shallow bowls we use for pasta should be perfect me thinks :D