Click on images to see enlarged version in a new window
Finally I got a chance to play with discharging fabrics - I've been seriously itching to do this and read a few sources (
Quilting Arts Magazine&
Fabric Art Workshop) as well as asking a ton of questions on Abstract Challenge Group and to my Dad.
Discharge dyeing is the method were you remove dye (colour) from fabric with bleach (or other various chemicals) - this can be done on several types of materials - but silk has it's own process to follow as bleach will eat away and ruin the silk. I opted to do simple bleach bath discharging.
In the June / July issue there was an article by Rose Hughes on how to do this, she recommended using a 1:5 solution of bleach to water - as well as 2 water baths for rinsing the bleach. In the magazine article she showed folding and pleating the fabric then wrapping it with string to prepare for it's bleach bath. In Fabric Art Workshop, the author showed another way to wrap up the fabric (altho this was for resistance painting) that I wanted to try as well. This method involved laying a string on dampened fabric diagonally, then folding it over; you then spun it around (remember snapping your friends with wet towels??) and pushed the twisted fabric to the middle and then tied the string together - this resembled a scrunchie when it was finished. So I took 3 pieces of fabric and had 2 different methods for binding up my little fabric rolls.
I found Quilting Arts to be over my head a bit when I first picked up the issue - and I still feel this way. What the author said was to put the fabric into your bleach solution and then to watch for colour change .. what she didn't mention is that the colour change would happen UNDER the strings (!?!) ... So here I am waiting for colour change that I couldn't see **groan**. One piece I pulled out in under 4 minutes or so because it looked like it was white - well it wasn't - I was seeing the backside of the fabric. So the one piece was underdeveloped as it were - and the rest were a bit overdeveloped. I got some unexpected and very cool results.
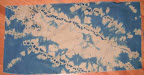 This piece here was done with the diagonal scrunchie method. This fabric was dampened first. You can see that this is one of the over developed pieces, but the results are very cool looking .. I still have some very usable parts on this - the larger white area was where the string had been directly touching the material. The other splotched areas are the inside parts of the scrunchie .. there was no colour change showing on this on the outside parts that were easily seen .. it wasn't until I pulled the fabric away that I saw the colour change ..
 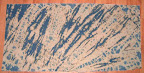 This is the other half of the same fabric - this was the fold and pleat method that turned this into a sausage shape .. for this one tho I started my folding and pleating in the corner and went diagonally instead of straight across .. you can see where the colour discharged under the strings .. again I saw no change on this until after I moved the strings. This material was not dampened before rolling.
 This was the second piece of fabric. I wish I had taken a picture of the FQ before I rolled this one - this was the second piece that I did the scrunchie method on and the first one I pulled out under 4 minutes in. You can see that the purple really faded in spots, while it turned reddish in others .. this was a really deep dark purple piece. Again, dampened before folding. I'm not sure I like this at all .. got rather different results with the same method - I'm thnking that solid colours would be best, but thought this would be really neat looking with the pattern.
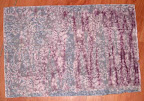 This was another fold n pleat method - you can see where the fabric is the really dark deep purple as I mentioned above .. but still more red than it was .. this was to long in the bath as well as the 2 blue ones were - I sort of like it, but am not sure on it - I didn't really want a blue piece :S I am rather disappointed in this one .. it was to long in the bath and I didn't get the results I was hoping for.
 This one was the most disappointing of all .. there is no change what so ever in this fabric .. I'm not entirely sure why .. I'm suspecting that this material wasn't washed, but am thinking that bleach should have done "something" to it .. even it it lightened it a bit .. but no change at all .. another unexpected result - and this one was left in the longest.
I'm not entirely sure of the amount of time that these were floating around, but it was under 15 minutes .. when I do this next, I'll be sure to time it amd check UNDER the strings at 4 minute intervals me thinks
I did have fun with this and as usual I learned a LOT ... I'm glad that I didn't end up using the light pink I was thinking of - that would have ended up pure white ... I am disappointed in my purple, I was rather hoping for more dramatic results as it started out as such a deep colour .. but again, they floated to long ..
So word to new people wanting to try this .. look UNDER the bloody strings :S
I absolutely will NOT get into dyeing. I can't keep up with everything else I've got going on and luckily fabric dyeing doesn't really call to me. My sister Deb and VickiW are both very into dyeing, have you seen any of their stuff on their blogs?
ReplyDeleteWas it fun for you?
Hi
ReplyDeleteI have not done this but another way to do fabric color discharge is with Gel dishwasher soap You might want to see if this soap has a bleach included in it. You can then use this an different large style rubber stamps. So another type of fun
I had some solids colored t-shirts that had some spots and little stains that I could wear out in public anymore. I decided to wrap them up in rubber bands like tie dying. I let them soak in bleach and water for about an hour and got amazing results. It made them look like they were supposed to be that way. I am going to try it with solid fabric.
ReplyDelete